Introduction
iPhone batteries are rated to hold 80% of their capacity for up to 500 charge cycles, which lasts roughly 18-24 months for most users. After that, your iPhone may need to be charged far more frequently, and iOS may warn you that performance is affected (in other words, your phone will run slower). Use this guide to replace your battery and restore your iPhone to like-new performance.
If your battery is swollen, take appropriate precautions.
Note: In this guide, the loudspeaker is removed to lower the chance of a battery adhesive strip breaking. It’s possible to remove the battery without removing the loudspeaker.
Note: After the repair, your iPhone may display a warning about the “genuineness” of the battery, even when using original Apple parts. If your iPhone functions normally, you can safely ignore the warning. Replacing the battery will remove the battery health and performance functions.
For optimal performance, after completing this guide, calibrate your newly installed battery: Charge it to 100% and keep charging it for at least two more hours. Then use your iPhone until it shuts off due to low battery. Finally, charge it uninterrupted to 100%.
What you need
-
-
Power off your iPhone before beginning disassembly.
-
Remove the two 6.8 mm-long pentalobe P2 screws at the bottom edge of the iPhone.
-
-
-
If your iPhone has a cracked screen, keep further breakage contained and prevent bodily harm during your repair by taping over the glass.
-
Lay overlapping strips of packing tape over the iPhone's display until the whole face is covered.
-
If the broken glass makes it difficult to get a suction cup to stick in the next few steps, try folding a strong piece of tape (such as duct tape) into a handle and lifting the display with that instead.
-
-
-
Use a hairdryer or heat gun or prepare an iOpener and apply it to the lower edge of the iPhone for about a minute in order to soften up the adhesive underneath.
-
-
-
Pull the blue handle towards the hinge to disengage opening mode.
-
Position the suction cups near the bottom edge of the screen—one on the front, and one on the back.
-
Push down on the cups to apply suction to the desired area.
-
-
-
Push the blue handle away from the hinge to engage opening mode.
-
Turn the handle clockwise until you see the cups start to stretch.
-
Wait one minute to give the adhesive a chance to release and present an opening gap.
-
Insert an opening pick under the screen when the Anti-Clamp creates a large enough gap.
-
Skip the next two steps.
-
-
-
If you're using a single suction handle, apply it to the bottom edge of the phone, while avoiding the very edge of the glass.
-
-
-
Pull up on the suction cup with firm, constant pressure to create a slight gap between the front panel and rear case.
-
Insert an opening pick into the gap.
-
-
-
Apply heat to the left edge of the iPhone for about one minute to soften the adhesive underneath.
-
-
-
-
If you haven't removed your suction handle or iSclack, remove it now.
-
Open the iPhone by swinging the display up from the right side, like the front cover of a book.
-
Lean the display against something to keep it propped up while you're working on the phone.
-
-
-
Use a Phillips screwdriver to remove the three 1.3 mm screws securing the battery and display connector cover.
-
-
-
Use a spudger or a clean fingernail to pry the battery connector up from its socket on the logic board.
-
Bend the connector slightly away from the logic board to prevent it from accidentally making contact with the socket and providing power to the phone during your repair.
-
-
-
Use a spudger or a fingernail to disconnect the display cable connector.
-
-
-
Remove three screws securing the front sensor connector cover:
-
One 1.7 mm Phillips screw
-
One 1.3 mm Phillips screw
-
One 1.8 mm Y000 screw
-
-
-
Swing the cover up from the center of the phone until the small clip by the edge of the phone unhooks.
-
-
-
Use a spudger or a fingernail to disconnect the front sensor assembly cable connector.
-
-
-
Use a Phillips driver to remove the four 1.7 mm screws securing the loudspeaker.
-
-
-
Each piece of adhesive has a black pull-tab at the end, which is lightly adhered to the edge of the battery.
-
-
-
Use the flat end of a spudger to gently lift up the edge of the top right battery adhesive pull-tab so that you can grab it with a pair of blunt tweezers.
-
Peel down the battery adhesive pull-tab to un-stick it from the top edge of the battery.
-
Repeat for the top left battery adhesive pull-tab.
-
-
-
Grab the bottom right pull-tab with your fingers and slowly pull it away from the battery, toward the bottom of the iPhone.
-
Pull hard enough to maintain tension on the strip, but don't force it. Give it plenty of time to stretch and un-stick from under the battery.
-
Don't press down on the battery. Hold the iPhone firmly by its sides.
-
Keep the strip flat and unwrinkled. Try to pull evenly on the whole strip, rather than pulling mainly in the middle or on one side.
-
Pull at a low angle so the strip doesn't snag on the edge of the battery.
-
If the adhesive strip breaks off, try to retrieve it using your fingers or blunt tweezers, and continue pulling—but do not pry under the battery.
-
-
-
Grab the bottom left pull-tab with your fingers and pull it away from the battery, toward the bottom of the iPhone.
-
Follow the same procedure as with the previous strip: don't press down on the battery, keep the strip flat and unwrinkled, and pull at a low angle.
-
If the adhesive strip breaks off, try to retrieve it using your fingers or blunt tweezers, and continue pulling—but do not pry under the battery.
-
-
-
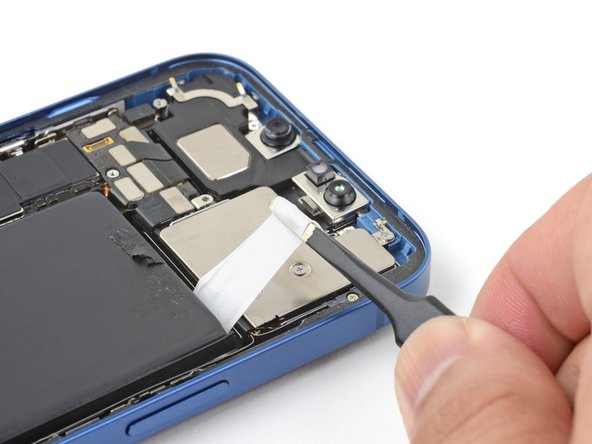
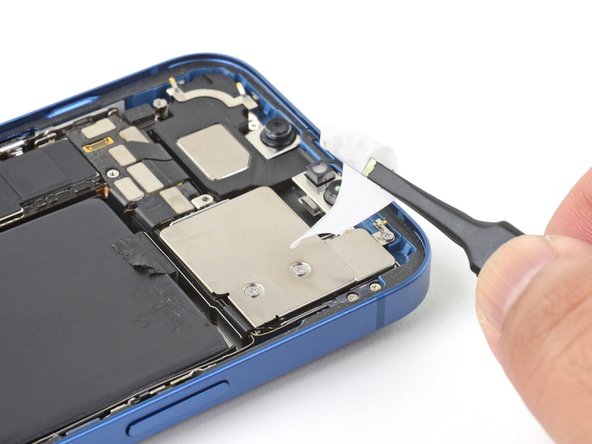
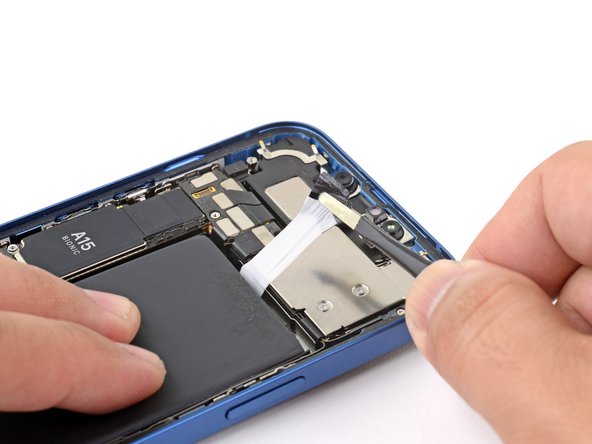
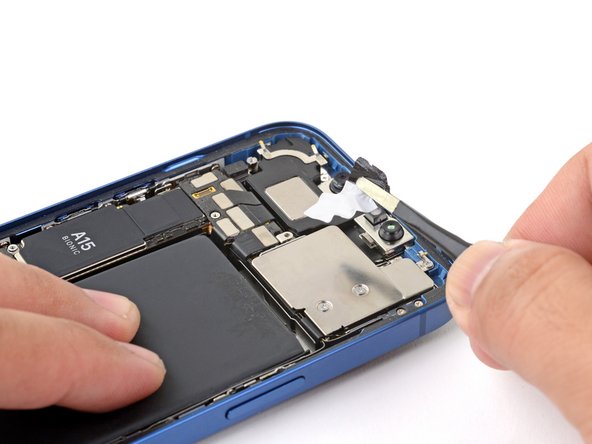
Use a pair of blunt tweezers to grab the entire width of the pull-tab.
-
Wrap the pull-tab and adhesive strip around the tips of the blunt tweezers.
-
Using the same procedure as before, pull the top right pull-tab to stretch and remove the adhesive strip. Try not to snag the adhesive on anything.
-
-
-
Lightly place two fingers on the center of the battery to prevent it from flinging out while removing the final adhesive strip.
-
Use a pair of blunt tweezers to pull and stretch the remaining tab to remove the final adhesive strip holding the battery in place.
-
If you removed all the adhesive strips successfully, skip the next step.
-
Otherwise, continue with the next step below.
-
-
-
If you're still having trouble removing the battery, apply a few drops of high concentration (90% or higher) isopropyl alcohol under the edge of the battery in the area of the broken adhesive strip(s).
-
Tilt the phone up so the isopropyl alcohol can flow toward the adhesive strip.
-
Wait about one minute for the alcohol solution to weaken the adhesive.
-
Use an opening pick or the flat end of a spudger to gently lift the battery.
-
-
-
Remove the battery from the iPhone.
-
If there's any alcohol solution remaining in the phone, carefully wipe it off with a coffee filter or allow it to air dry before installing your new battery.
-
Compare your new replacement part to the original part—you may need to transfer remaining components or remove adhesive backings from the new part before installing.
To reassemble your device, follow these instructions in reverse order.
Take your e-waste to an R2 or e-Stewards certified recycler.
Repair didn’t go as planned? Try some basic troubleshooting, or ask our iPhone 13 Answers community for help.
Cancel: I did not complete this guide.
11 other people completed this guide.


